This post may contain affiliate links. Please read our disclosure policy.
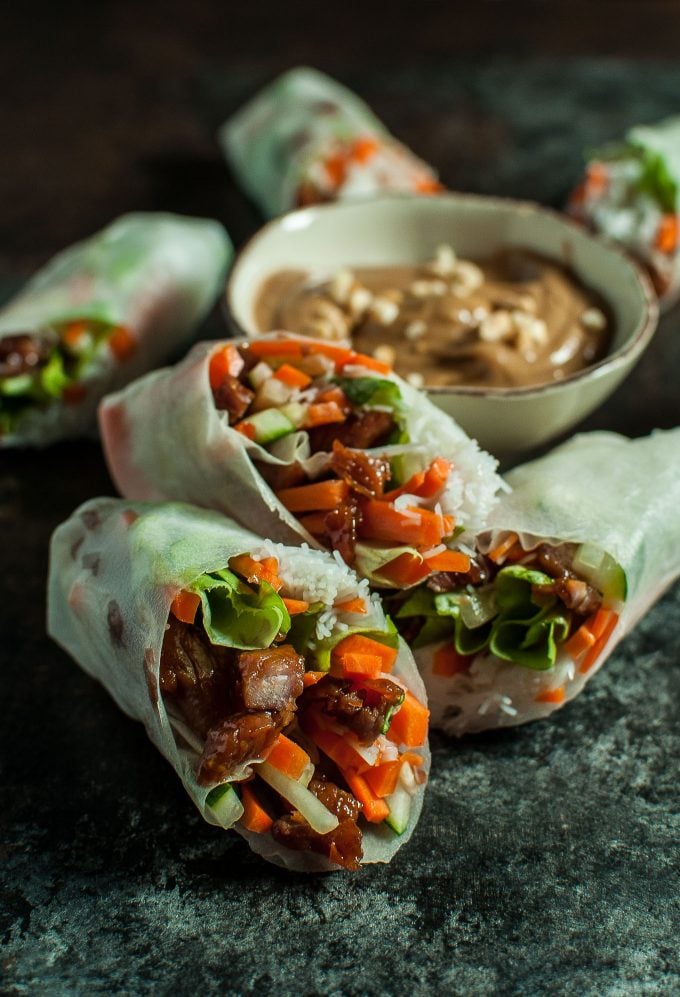
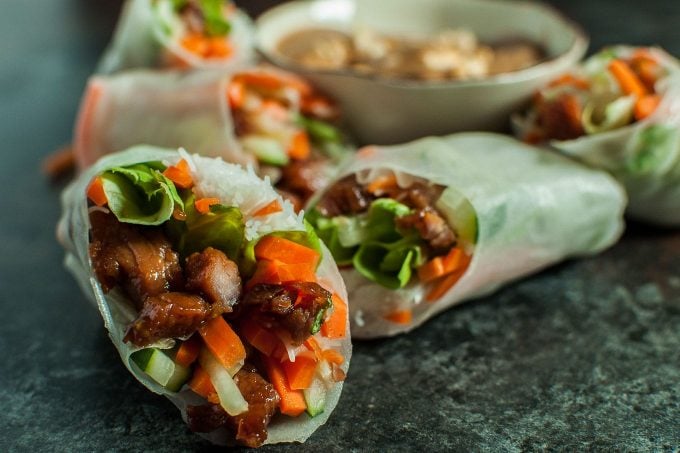
Sticky-sweet caramelized pork is complemented by crisp lettuce, carrots, scallions, and cucumber and wrapped in rice paper with vermicelli. The creamy peanut sauce makes the perfect dip for these fresh caramelized pork summer rolls.
If you’ve never made summer rolls, you need a little bit of patience, but it’s not so bad once you get the hang of it. They won’t look perfect right away, but that’s ok. It’s the taste that matters, right??
I love Vietnamese food in general, and summer rolls are definitely up there. So is caramelized pork. It seemed like a good idea to combine the two!
My tips for making these caramelized pork summer rolls:
- Give yourself some time (like at least a couple of hours if you’ve never made these before).
- Make sure you have everything ready. I am guilty of often not getting things ready prior to cooking (and so I forget things and/or run around like a headless chicken)… but this is one case when it really is important to have everything laid out and ready to go.
- After you wet the rice paper, you need to make the roll right away. The rice paper becomes more flimsy and harder to use the longer it’s wet.
- Don’t over stuff the rolls. You risk tearing the paper and it just makes it much harder to roll them. You’ll find a balance after you screw a few up 🙂
- If you’re making these ahead of time (or not eating them right away), store them on damp paper towel. That way they won’t stick to the plate/surface they’re on. Place another piece of damp paper towel over top of them so they don’t dry out. I’ve successfully stored these until the next day by using the damp paper towel technique (I put them in a Tupperware container with the damp paper towel on the bottom and top).
- I’ve seen people wet the rice paper in various ways. The way I find easiest is to fill a large bowl with water and then dip the paper in and ensure it’s coated with water. This only takes a few seconds. You want the rice paper to still be somewhat firm when you start making the rolls so it doesn’t totally disintegrate.
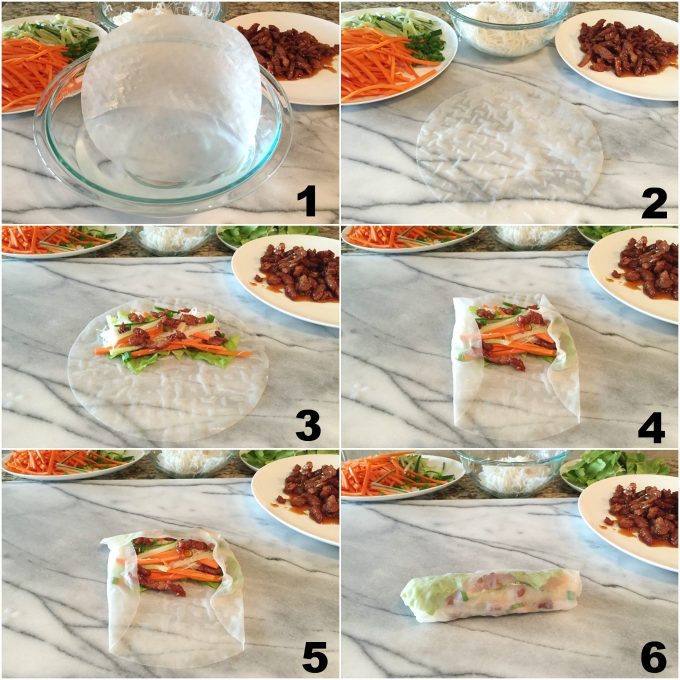
I don’t usually do step-by-step photos, but I did them for this recipe since I think they could be useful.
How to make pork summer rolls step-by-step:
I hope you enjoy these caramelized pork summer rolls. They’re totally worth the effort!
Questions? Let me know!

Caramelized Pork Summer Rolls
Ingredients
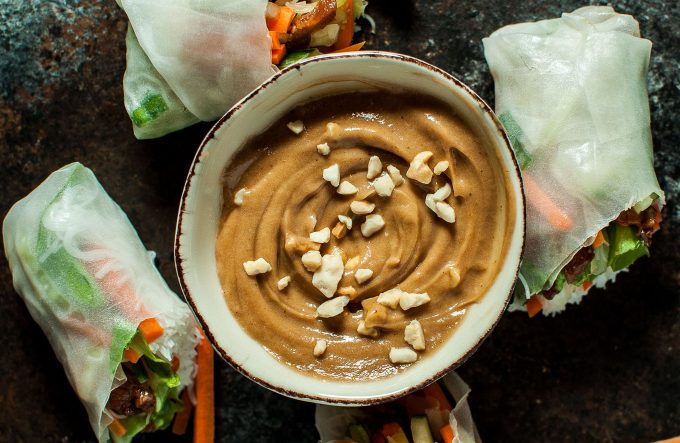
Dipping Sauce:
- 1/4 cup peanut butter
- Juice of 1 lime
- 3 tablespoons hoisin sauce
- 1 clove garlic minced
- 2 tablespoons peanut oil
- Chopped peanuts (for garnish)
- Salt & pepper to taste
Caramelized pork:
- 1 pork tenderloin (about 1 pound)
- 3/4 cup granulated sugar
- 2 tablespoons fish sauce
- Salt & pepper to taste
- 2 cloves garlic minced
- 1 teaspoon sesame oil
Summer rolls:
- 1 pack rice paper (I used 8 1/2 inch size)
- 2 large carrots cut into thin sticks
- 1/2 cucumber cut into thin sticks
- 4 scallions (green parts) chopped
- 1/2 butter leaf lettuce
- 4.4 ounces vermicelli (I used about half a package)
Instructions
- Start by making the dipping sauce by adding the dipping sauce ingredients (except the chopped peanuts) to a food processor and blending until smooth. Transfer to the container(s) you want to serve it in, sprinkle on the chopped peanuts, and put it in the fridge until needed.
- Cut pork into bite-size strips, and remove any fat/gristle.
- Add the sugar in an even layer to the bottom of a heavy skillet on medium-low heat. It may take a few minutes for anything to happen... but if nothing happens for like 10 minutes, increase the heat a bit. Watch the sugar carefully. Once it melts and turns a nice caramel color, add the pork and stir until it's coated. It's ok if it appears to be a sticky mess.
- Add in the fish sauce and salt & pepper and stir. Cover the pan and cook for about two minutes. Add in the garlic and sesame oil and stir. Cook uncovered for about 20 minutes, stirring occasionally, until the sauce reduces and the pork is caramelized in the delicious sticky sweet sauce. When it's cooked, transfer to a bowl or plate.
- While the pork is caramelizing, it's a good idea to start chopping the vegetables and cook the vermicelli to make use of the time. Peel the carrots and cut them into matchsticks. I don't peel the cucumber; I just cut it into matchsticks. Chop the green parts of the scallions. Tear the lettuce into bite-size pieces. Set the vegetables aside on a plate so they're ready to go. The vermicelli only takes a few minutes to cook. Add it to boiling water and follow package directions. I drain it using a sieve and rinse it under cool water so it cools faster. Place in a bowl and set aside.
- When you've completed the above steps, it'll finally be time to assemble the summer rolls 🙂 Fill a large bowl full of cool water. Wet a piece of rice paper and then place it on the surface you'll be assembling the rolls on.
- Add the vermicelli, vegetables, and pork to the top third of the rice paper. Fold the sides over slightly and then fold the top over so it just touches the filling. Tuck in the filling with your hands as you roll it towards you. Keep in mind you want the rolls to be fairly firm, but if you roll them too tightly, you'll break the paper. Don't worry... you'll get the hang of it 🙂
- Repeat the process for as many rolls as you have stuffing for. Serve the summer rolls with the peanut dipping sauce. You can keep the rolls intact or cut them in half. Enjoy the fruits of your labor.
Notes
- Caramelized pork recipe is adapted from NY Times Cooking.
- It's hard to say exactly how many summer rolls this recipe makes since it really depends how much you stuff them, but it easily makes at least 10 rolls.
© Salt & Lavender Inc. Content and photographs are copyrighted. Sharing this blog post is much appreciated, but copying and pasting full recipes without authorization to social media is strictly prohibited.


Made these last night and they were a hit!! Had to be patient with the sugar. When I added the pork, it definitely hardened. However, the sugars quickly remelted and turned into a wonderful sticky sauce. Will be making again!
I’m so glad it worked out for you, Caroline! 🙂
Everything tasted good, but because the pork cooked so long it was really dry. Any thoughts on how to avoid that? A way to cook it quicker?
I haven’t tested it, but I suppose you could make the sauce (like cook it until it’s reduced), and then add the pork in maybe?
I found that using ground pork work better both for caramelization and for eating!
Good tip! I should try that!
Hi,
When I caramelised the sugar I quickly put pork in but the sugar when to toffee and shards hanging onto the pork.
I peeled ll the hard shards off and started again. It was much better the 2nd time and the pork broiled for 20 mins but not really the sticky ribs I was looking for.
Overall, I liked it though, just adding feedback.
Thanks, Darlene! Yes, it does seem like some people have had a bit of trouble with this recipe, unfortunately. I am glad you liked it, though. 🙂
Unfortunately, these didn’t work for me. I made two batches side by side of the meat. The first one I followed instructions as given, but had the same issue with the sugar first turning into a caramel color, but never sticking. That batch wasn’t sweet at all. The second batch I threw the pork in before the sugar caramelized. Although it was nothing like the sweet sticky texture I was looking for, it tasted much better than the first batch. Also, I was not a fan of the peanut sauce. This may be a personal preference, but I felt the peanut butter overpowered all other ingredients and it was too thick.
I’m sorry to hear that, Esther!
Omg I made this step by step and it turned out SO GOOD. Other carmelized pork recipes require too many ingredients or are too complicated to make, but this was easy peasy. Thank you so much for posting!
That’s great to hear!! I am so happy that it worked out. 🙂
do I need to use brown sugar or regular sugar?
I used regular granulated sugar. I will update the recipe. Hope you enjoy it!! 🙂
My sugar just hardened and became a huge mess once I added the pork 🙁 super bummed. It’s all the pork I had and I couldn’t use it
I’m sorry to hear that, Aubri! 🙁 I’m guessing that you’ve thrown it out? It sounds like you hit the point in the recipe where I mention that it becomes a sticky mess. If you continued past that point, the sugar should have re-melted the longer you cooked it for. Could you please provide more info? I am happy to help troubleshoot this with you.
This happened to me too. I think it’s because my meat was still cold. It remelted, but the sauce never thickened again. I even threw a cornstarch slurry in, but it stayed liquidy. The meat tastes good, just didn’t get a thick caramelized glaze on it.
Hmm that’s good to know! Thanks for your comment, Karlie.
I love love love summer rolls, especially with peanut sauce!! I always get them when we go out for Vietnamese food, and then I eat the leftover sauce with a spoon. I’ve made my own a few times but they have not turned out as beautiful as yours – I think I always get greedy and overstuff them 🙂 These look awesome!
Aw thanks Kate!! They’re my favorite too. And I totally do the same with the dipping sauce 🙂
Looks so good Natasha! And I love the step-by-step tutorial! Can’t wait to try.
Thanks Cathy!! Let me know if you enjoy these 🙂 Have a good weekend!