
This post may contain affiliate links. Please read our disclosure policy.
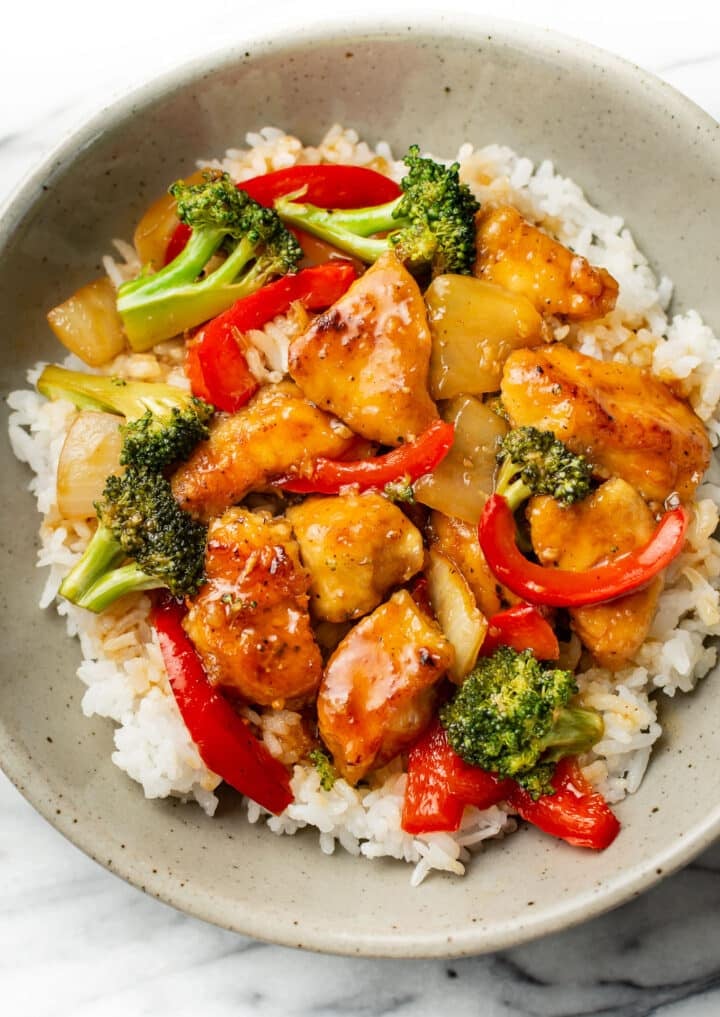
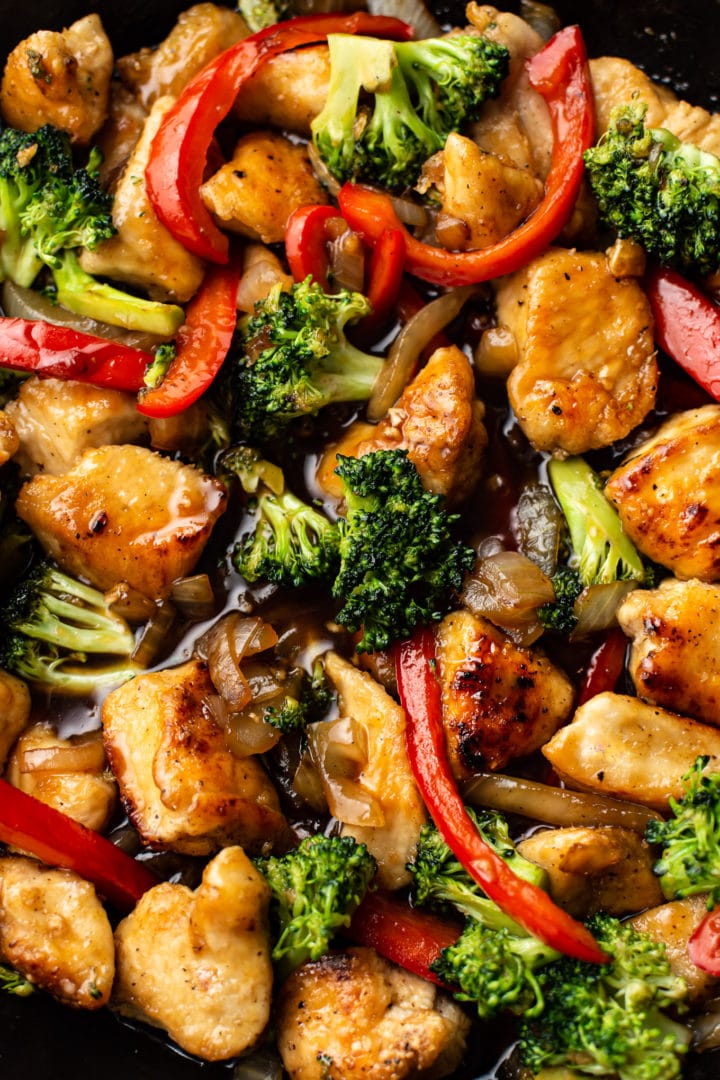
This easy teriyaki chicken stir fry recipe has broccoli, bell peppers, onions, and tender chicken coated in a sweet and sticky sauce. It’s a delicious weeknight meal!
You may also like my Easy Teriyaki Chicken. It’s similar to this but without the veggies.
Why you’ll love it
It’s very satisfying making this homemade teriyaki chicken stir fry. The sauce is just so tasty, and it’s healthier than takeout. One lovely reader describes this as “the best stir fry that I’ve ever made”, and I hope you’ll agree!
You don’t need any fancy cookware like a wok to make this simple teriyaki stir fry, and all the ingredients can be bought at the grocery store. (Feel free to use a wok if you have one, though!) Prep is easy, and it’s on the table in just 35 minutes.
What you’ll need
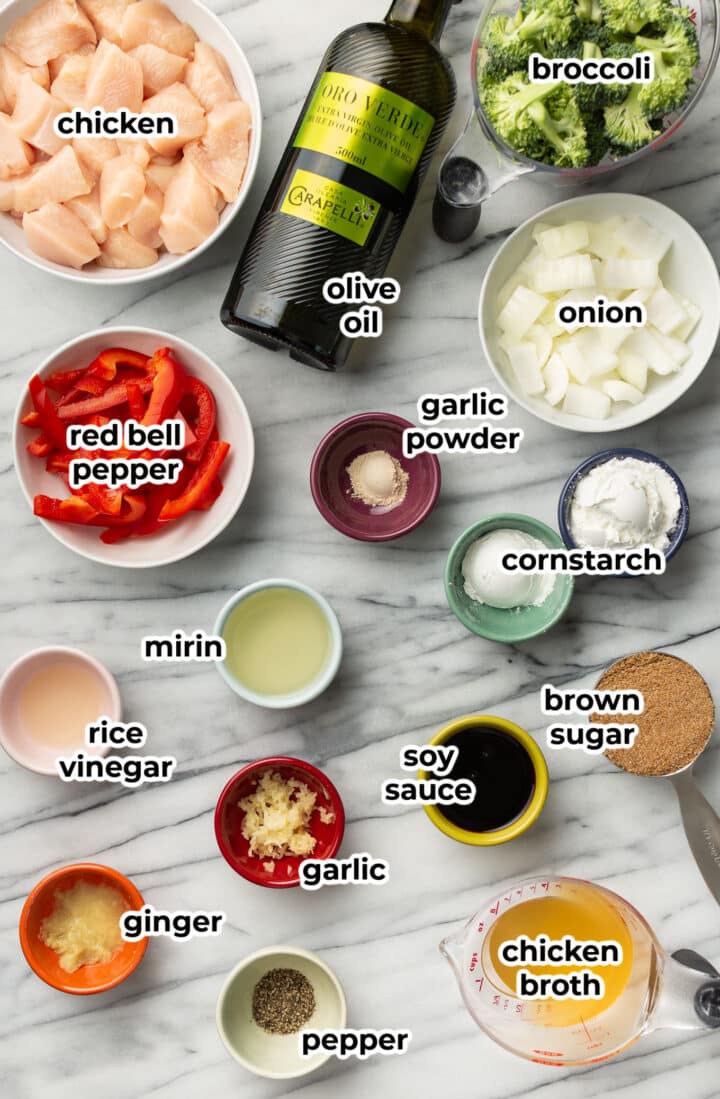
- Chicken – we’re using boneless skinless chicken breasts
- Garlic powder, pepper, and cornstarch – to season the chicken directly and get a nice crust
- Olive oil – for stir frying
- Vegetables – I chose onion, broccoli, and red bell peppers
- Sauce – our delicious homemade stir fry sauce has chicken broth, mirin, soy sauce, rice vinegar, brown sugar, cornstarch, fresh ginger, and garlic.
What is mirin?
- Mirin is a sweet Japanese rice wine (similar to sake but with more sugar) that helps give teriyaki sauce its signature flavor. Most grocery stores will carry a version of it (I use Kikkoman brand; it’s described as “mirin style sweet cooking seasoning” and sometimes “Aji-mirin”), which is fine for this recipe.
- If you want something a little more authentic, you may want to check an Asian foods specialty shop.
- Mirin substitutions: If you don’t have mirin, try a dry sherry or sweet marsala wine.
Keys to stir fry success
- Prep everything beforehand. I am someone who usually cooks as I go along, but with stir fry you need everything to be ready to go!
- Don’t over-crowd the pan. I cook the chicken in batches, and I don’t add *too* many veggies because they won’t sear as nicely and you’ll end up with a watery stir fry.
- Maintain a fairly high heat. It’s ok to reduce the heat a little bit if the pan starts to really smoke/things are burning, but don’t turn it down too much. The second batch of chicken tends to cook a little faster because the pan is hotter, so make sure to pay close attention to it so you don’t burn it.
How to make teriyaki chicken stir fry
This is an overview with step-by-step photos. Full ingredients & instructions are in the recipe card below.
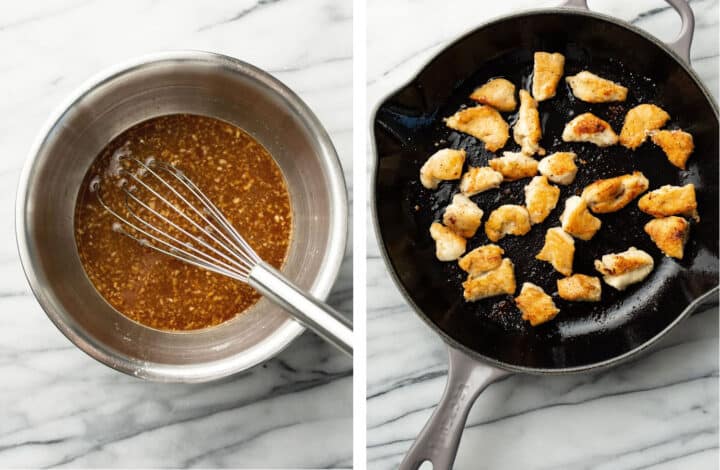
Prep all the ingredients. Whisk the sauce ingredients in a bowl. Cut up the chicken and season it. Stir, then toss with cornstarch. Heat up the oil in a skillet until very hot. Working in batches, cook the chicken through. Transfer to a plate.
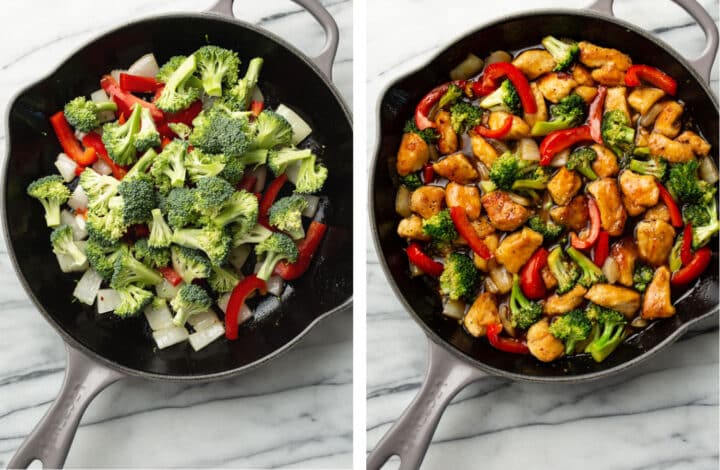
Top up the oil if needed, then add the onions followed by the broccoli and bell peppers a minute later. Cook until tender-crisp. Return the chicken to the pan, and pour in the sauce. Toss, let it bubble for under a minute, then serve.
Tools for this recipe
Check out Natasha’s favorite kitchen essentials, gadgets, and cookware!
- I like using tongs to quickly toss the ingredients while cooking. They’re great for turning the chicken quickly. I also love my splatter guard for cooking the chicken since it reduces clean-up.
- The easiest way to store fresh ginger is to keep it in the freezer! That way you never run out, and it’s also much easier to grate. I use my Microplane to grate it.
- This is the skillet I use for this stir fry.
Substitutions and variations
- I recommend trying the sauce as written before making any variations since it’s been well tested.
- This recipe doesn’t make a ton of extra sauce, but it’s sweet and rich and coats the chicken and veggies nicely. That said, many readers do double it!
- A few reader favorite additions include cashews and water chestnuts.
What to serve with teriyaki chicken stir fry
- I like making this with rice, but you can definitely serve this dish over noodles instead.
- Top with fresh bean sprouts for added crunch or even sesame seeds.
Leftovers and storage
- Store leftover stir fry in the fridge in a covered container for 3-4 days.
- Reheat in a saucepan over a low heat until warmed through.
- You could freeze it, but the veggies will soften up a bit and texture may change. If you don’t mind that, it should still taste good.
More Asian-inspired recipes
If you made this teriyaki chicken stir fry, please leave a star rating and review in the comments below! Have questions? Talk to me. You can also follow me on Instagram.

Teriyaki Chicken Stir Fry
Ingredients
- 2 boneless skinless chicken breasts
- 1/2 teaspoon garlic powder
- Pepper to taste
- 3 tablespoons cornstarch
- 3 tablespoons olive oil divided
- 1/2 medium onion
- 2 cups broccoli florets
- 1/2 red bell pepper
Sauce:
- 1/2 cup chicken broth
- 3 tablespoons mirin see note
- 2 tablespoons soy sauce
- 1 teaspoon rice vinegar (or apple cider vinegar)
- 1/4 cup (packed) brown sugar
- 1 tablespoon cornstarch
- 1 teaspoon grated fresh ginger
- 2 cloves garlic minced
Instructions
- Prep the ingredients before you start cooking – once the recipe is started, it goes quickly. Cut the veggies into bite-size pieces (make sure that the broccoli is cut quite small) so they cook at a similar rate.
- Add the sauce ingredients to a medium bowl and whisk everything together.
- Cut the chicken into 1" pieces and add them to a bowl. Sprinkle the pieces with the garlic powder and some pepper. Stir to combine. Add the cornstarch and stir until the chicken is coated.
- In a deep skillet, over medium-high heat, add 2 tablespoons of the oil. Let the pan heat up for a few minutes.
- You will cook the chicken in two batches to get the best browning. Add half the chicken to the skillet, shaking off the excess cornstarch prior to adding it to the pan. Cook for 4 minutes and then flip and cook for another 3–4 minutes or so. I flip using tongs to make it easy. The chicken should be browned and cooked through. Transfer to a plate. Repeat for the second batch, adding the third tablespoon of olive oil to the skillet.
- If the pan is dry, add a small splash of olive oil (a teaspoon or so), and then add the onions. Cook for 1 minute, stirring a few times.
- Add in the broccoli and peppers, and cook for 3 minutes, stirring often. Veggies should be tender-crisp. Give it a little longer if you want them softer.
- Add the chicken back to the pan and stir in the sauce (whisk it again quickly prior to pouring it in). Let it bubble until thickened (less than a minute), stirring constantly so everything is coated. Take the pan off the heat and serve immediately.
Notes
- I love to serve this recipe with rice, but that’s totally optional! I typically measure out 1 cup of uncooked rice to serve 4, but feel free to make as much rice as you normally do. Start the rice before the chicken so that it’s ready at the same time.
- Please read the post for stir fry tips – especially if you’re not very experienced with this type of recipe.
- Mirin is a sweet Japanese rice wine. For this recipe, it’s fine to use the grocery store version (found in the Asian foods aisle near soy sauce etc.). I use Kikkoman brand.
- The fresh ginger is much easier to grate if it’s frozen. I always keep some fresh ginger in the freezer and I use my Microplane grater/zester to easily grate it.
- Nutrition info does NOT include rice for this recipe.
- This recipe is also in the Salt & Lavender: Everyday Essentials cookbook.
Nutrition
Nutrition information is automatically calculated, so should only be used as an approximation.
© Salt & Lavender Inc. Content and photographs are copyrighted. Sharing this blog post is much appreciated, but copying and pasting full recipes without authorization to social media is strictly prohibited.
This recipe was originally published on July 19, 2020. It’s been updated with new photos and better instructions but is the same great recipe!


I made it , it was so good and easy to make. Your instructions was 😊 great thank you
Aww thank you, Kecia!
Three weeks in a row of prepping this for my weekly lunches. I’m a gym bro, and this meal covers all my bases. I definitely use a lot more veggies, and crowd the pan against your advice, but it tastes just fine to me. I also serve this over rice. Thanks for adding a bit of whimsy to this guy’s otherwise boring meal rotation.
You’re very welcome, Sam!! 😀 I love that!