This post may contain affiliate links. Please read our disclosure policy.
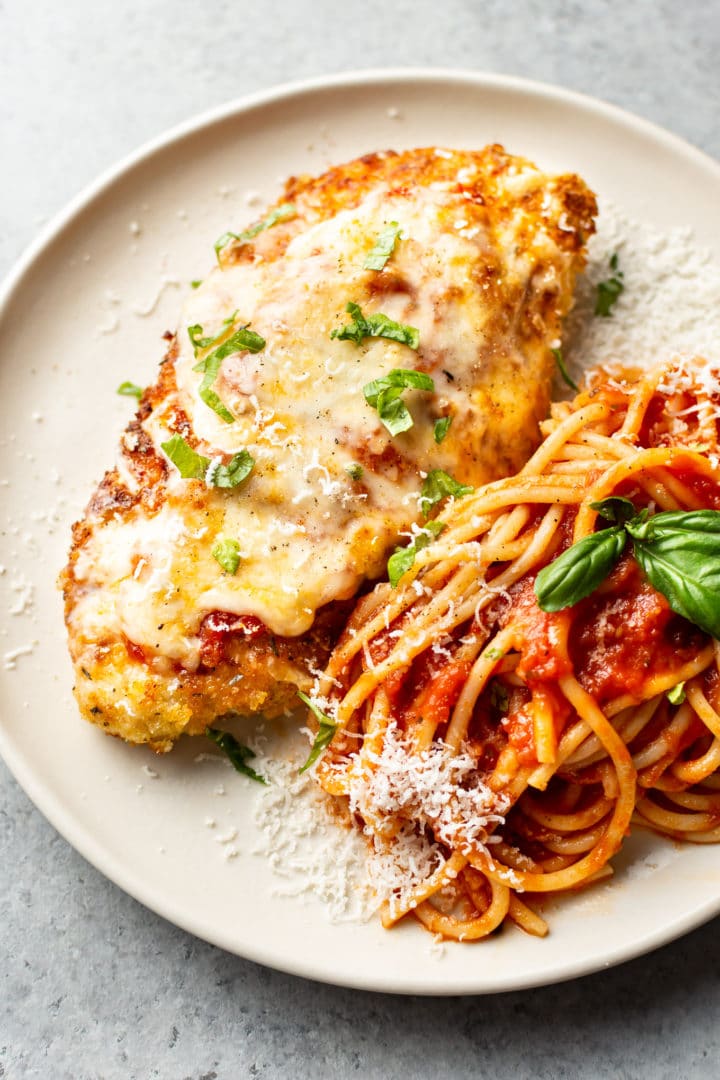
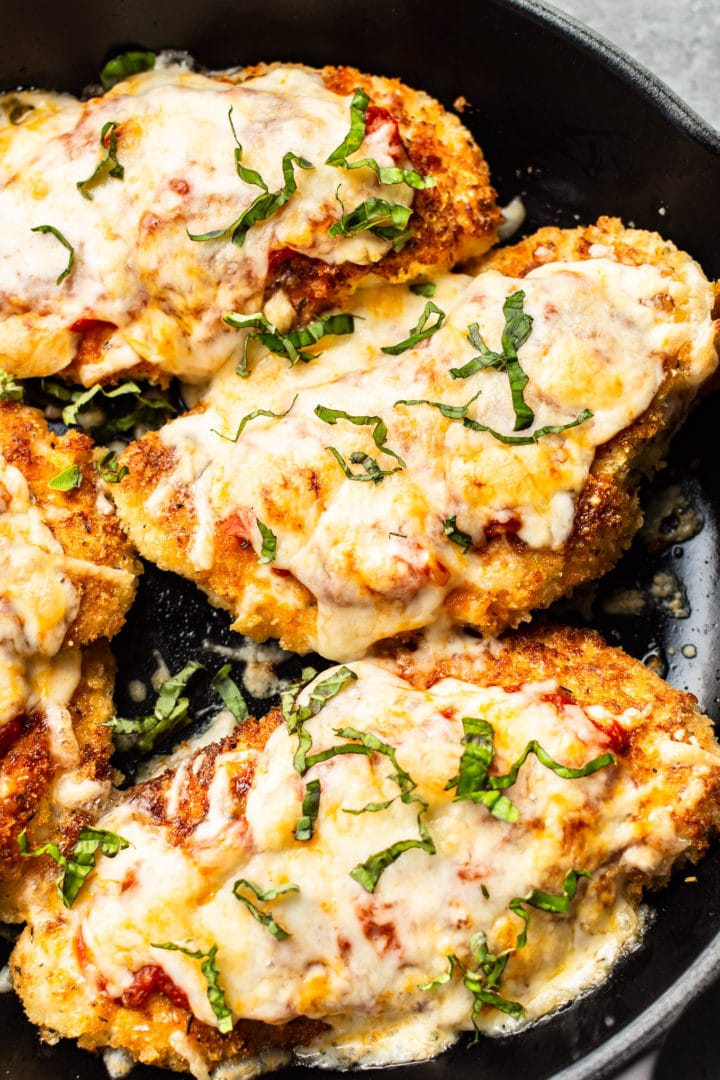
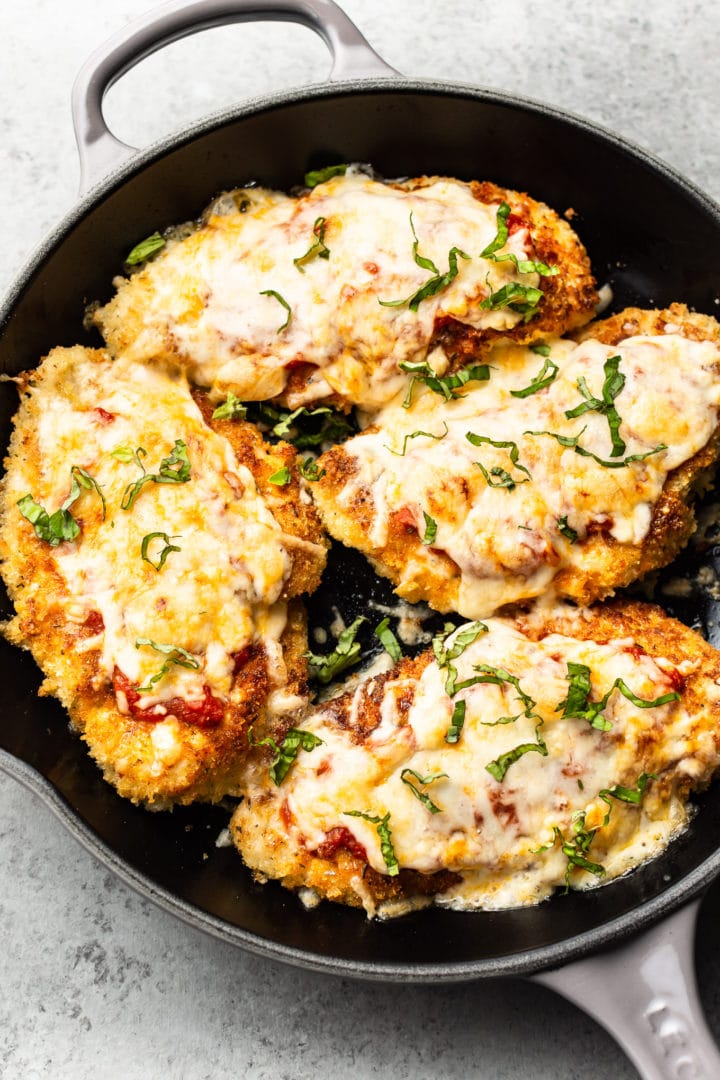
This Chicken Parmesan recipe has crispy breaded chicken breasts that are tender on the inside and baked to melty, cheesy perfection with mozzarella cheese over a layer of marinara sauce.
Looking for something even easier? Try my Chicken Milanese or Parmesan Crusted Chicken!
Why you’ll love it
Chicken Parmesan (or Chicken Parmigiana as it’s also known) is an Italian-American comfort food staple that’s a fixture in restaurants across North America! My version has really crispy breading (a combination of panko breadcrumbs and grated parmesan cheese), just enough Marinara Sauce on top, and plenty of melted mozzarella cheese.
This simple chicken parm recipe will give you the confidence to replicate it in your own home. There’s no need to be intimidated when making this restaurant-quality dish that’s ready in no time. You can also try my Chicken Parmesan Meatballs for a fun twist with these classic flavors!
What you’ll need
- Chicken breasts – tender pan fried chicken is the foundation of this recipe
- Garlic powder – my not-so-secret ingredient to jazz up the flavor even more
- Flour – for dredging the cutlets
- Eggs – the egg wash ensures everything binds together
- Panko breadcrumbs, parmesan, Italian seasoning – this mixture makes the best breading
- Olive oil – for frying the cutlets to golden perfection
- Marinara sauce – you can use your favorite sauce from a jar or homemade. We’re not using as much on the chicken itself compared to other recipes out there to keep the breading extra crispy!
- Mozzarella cheese – that signature cheesy, melty topping
- Fresh basil – completely optional but gives a burst of freshness to top it all off
Easy shortcuts
- You don’t need to spend time pounding the chicken breasts; here they’re simply cut in half lengthwise to make thinner cutlets.
- To make clean-up even easier, this entire recipe is made in the same skillet from start to finish. No transferring to a baking sheet necessary!
How to make Chicken Parmesan
This is an overview with step-by-step photos. Full ingredients & instructions are in the recipe card below.
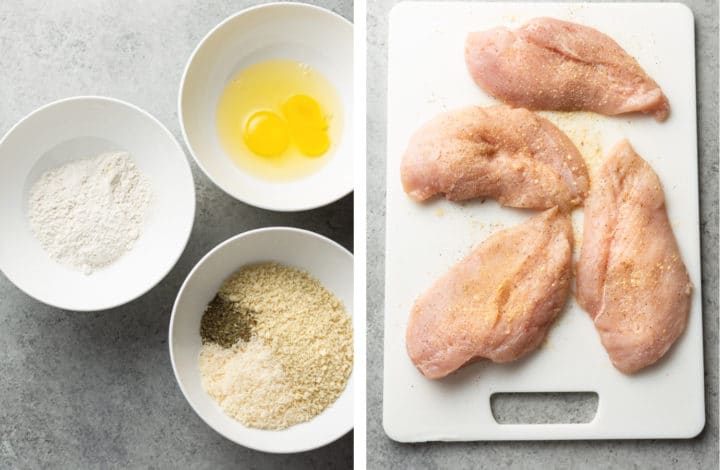
Preheat your oven to 400F, and prep all your ingredients. Start boiling the pasta if serving with it. Cut the chicken breasts lengthwise into 4 thinner cutlets and season on both sides with garlic powder and salt & pepper.
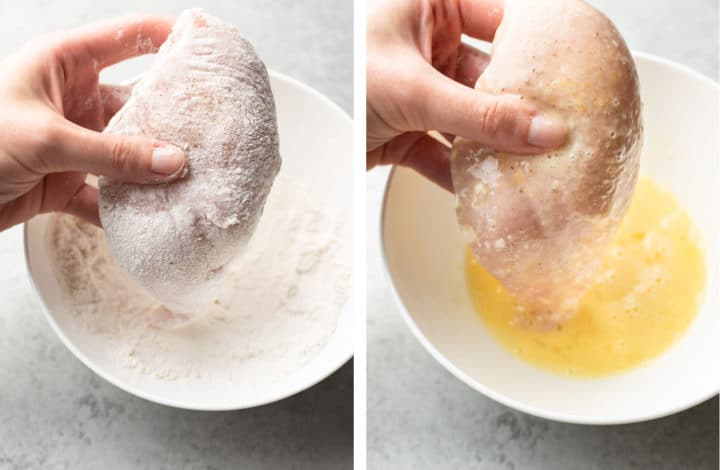
Coat the cutlets in flour, and then dip into the egg mixture. Meanwhile, warm the marinara sauce in a saucepan over low heat.
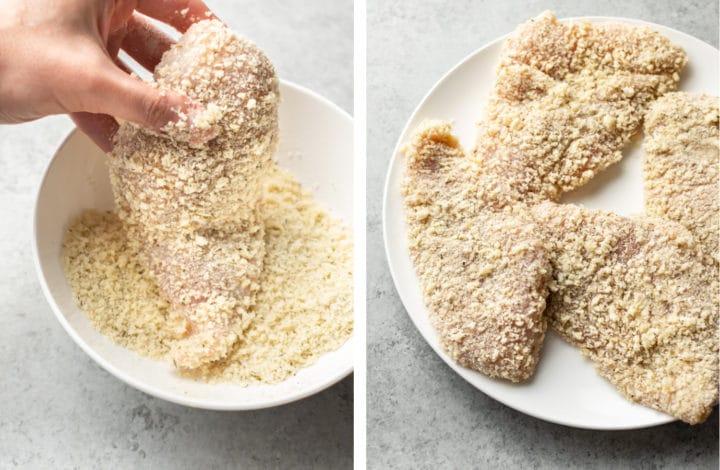
Shaking off any excess of the egg mixture, dip the chicken pieces into the breadcrumbs. Transfer cutlets to a plate.
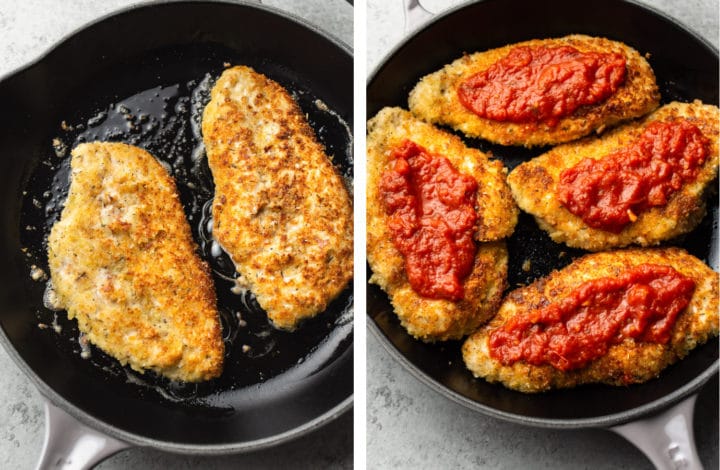
Cooking the chicken in two batches, add cutlets to an oven-proof skillet with olive oil over medium heat. When golden brown, transfer to plate. Add all four cutlets back into the skillet (or transfer to a baking dish if you don’t have an oven-proof skillet), and bake in the oven for 5 minutes. Spoon on the marinara sauce.
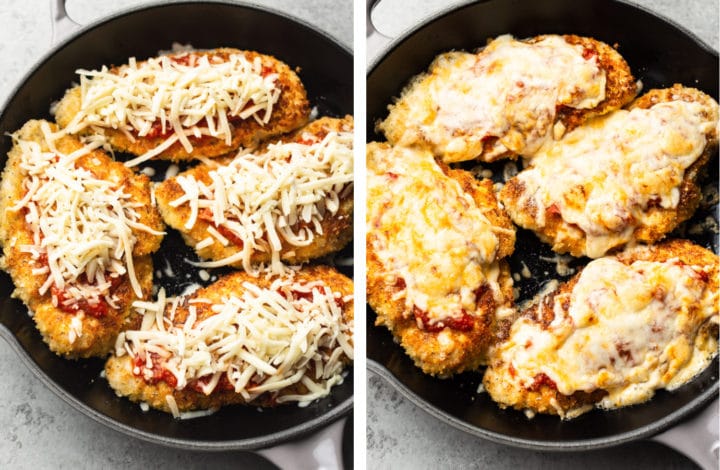
Finally, top the chicken with mozzarella, and broil until bubbly and golden! Toss the remaining marinara sauce with the pasta. Add basil if desired.
Helpful tips
- Make sure that you dry off the chicken before getting started. Just pat it with paper towel.
- During each step of the dredging process (flour, egg, breadcrumbs), be sure to shake off any excess.
- Be generous with the coating. You want to ensure the cutlets are fully coated. Don’t skimp.
- When you’re frying, don’t overcrowd the pan. I do two pieces at a time and give them plenty of room. Be sure to let the pan heat up prior to adding the chicken.
- Don’t move the chicken around the pan. Once it’s in there, leave it alone until it’s time to flip it. When you’re ready to flip, gently lift an edge up and check it’s nicely golden brown.
Leftovers and storage
- It’ll last for a few days in the fridge in an airtight container, but the breading will soften up the longer you leave it. Eat it right away if you can!
- If you’re wondering how to reheat Chicken Parmesan, preheat oven to 400F. Let the chicken warm up on your counter. Place a wire rack on a baking sheet. Add the chicken on top, and bake for 15 minutes or until heated through. Broil it for a few minutes at the end if you wish. This method encourages air circulation so the breading will be less soggy (covering the breaded chicken with foil will make it steam and go soft, so I don’t recommend that method).
- You can try freezing it, but I can’t guarantee it’ll be as crispy. I haven’t personally tried this, but the general process is to freeze the breaded & fried chicken separately from the marinara sauce and cheese. You then let it thaw in the fridge (preferably overnight), reheat in the oven (see my instructions below), and then add the cheese and sauce and broil.
Tools for this recipe
- Chicken is cooked when an instant read thermometer reads 165F. I highly recommend buying one since it’s much easier (and safer) than guessing if chicken is done. And overcooked chicken is not good either!
- I used an oven-safe skillet for this recipe (my Le Creuset 10.25″ one). It’s handy for so many recipes. I also love my Lodge cast iron skillet (a more economical choice). If you don’t own one, simply transfer the chicken after frying it to a baking dish or baking sheet for the oven steps.
- Cooking tongs are one of my most-used kitchen items, and they make flipping the cutlets a lot easier.
- I prefer to grate my own parmesan cheese using this grater. It melts and tastes better than the pre-grated kind!
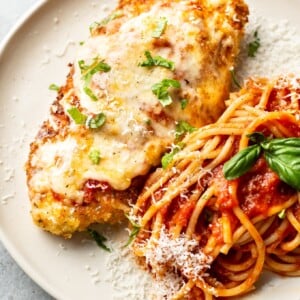
What to serve with Chicken Parmesan
- I prefer spaghetti tossed in marinara sauce, but you could try any other kind of pasta, Mashed Potatoes, or Gnocchi.
- You can’t go wrong with a big slice of Cheesy Garlic Bread.
- Try a Caesar salad with my homemade Caesar Dressing or this Olive Garden Salad Dressing!
More delicious recipes to try
I hope you will love this easy Chicken Parmesan recipe! Questions? Ask me in the comments below! As always, tag me #saltandlavender on Instagram so I can see your creations.
Chicken Parmesan
Ingredients
- 2 large chicken breasts cut in half lengthwise
- 1/2 teaspoon garlic powder
- Salt & pepper to taste
- 1/4 cup flour
- 2 eggs beaten
- 2/3 cup panko breadcrumbs
- 1/2 cup freshly grated parmesan cheese
- 1/2 heaping teaspoon Italian seasoning
- 1.5 cups marinara sauce see note
- 3 tablespoons olive oil divided
- 3/4 cup shredded mozzarella
- 8 ounces spaghetti or other pasta optional
- Fresh basil optional, to taste
Instructions
- Preheat the oven to 400F. Move the rack to the top third of the oven. Boil a salted pot of water for the pasta if that's what you're serving it with. Cook the pasta al dente according to package directions.
- Cut the chicken in half lengthwise so you have 4 thinner pieces. Pat it dry with paper towel. Sprinkle it with the garlic powder and some salt & pepper (both sides).
- Prepare 3 bowls: one with the flour, one with the eggs (beat them with a fork), and the third with the panko + parmesan + Italian seasoning (mix it all together).
- Add the marinara sauce to a saucepan and warm it over low heat (it needs to be hot for step 8).
- Add 2 tablespoons of olive oil to an oven-proof skillet over medium heat. Let the pan heat up while you're doing the next step.
- Meanwhile, coat the chicken pieces in the flour. You will then dip each piece in the egg, followed by the breadcrumb mixture (shake off any excess at each of the 3 steps). I find it easiest to do the dipping with one hand and leaving the other one free (or your hands get messy and it's all harder to work with). You may need to press the chicken into the breadcrumbs a bit to make them stick.
- Add 2 chicken pieces to the skillet (give them lots of space) and cook for about 2-3 minutes/side (should be golden and crispy). I use tongs to easily flip it. Transfer the chicken to a plate, and for the second batch, add another tablespoon of oil to the pan. Once you've fried all the chicken, take the skillet off the heat and arrange all 4 pieces inside. Transfer the skillet to the oven and bake for 5 minutes.
- Take the skillet out of the oven. Turn the broiler onto high. Spoon a bit of hot marinara sauce over top of each piece of chicken (I top each piece with about 2 tablespoons of sauce and reserve the rest for tossing with the pasta). I don't add too much sauce because then the breading will go soggy (don't put so much that it runs off). Top the chicken with the mozzarella cheese and return the skillet to the oven. Let the cheese melt/go bubbly (this will only take a few minutes – watch it carefully so it doesn't burn). Meanwhile, toss the drained pasta with the remaining marinara sauce.
- Serve immediately with pasta on the side and some fresh basil if you wish.
Notes
- This recipe assumes you’re making chicken parm with pasta. If you’re not, only warm up about 1/2 cup of marinara sauce. If you want lots of sauce on the pasta or you’re making more pasta than suggested, you may want to go up to 2+ cups sauce.
- See blog post for more tips if you’ve never breaded chicken before (the breading will be less likely to fall off). I also included handy process photos of each step within the blog post.
- You can transfer the chicken to a baking dish for step 8 if you don’t have an oven-proof skillet.
- Nutritional information is provided as a courtesy only and should be construed as an estimate rather than a guarantee. Ingredients can vary and Salt & Lavender makes no guarantees to the accuracy of this information. Nutritional info just includes the chicken + 1/2 cup marinara sauce. I left the extra marinara sauce and pasta out of the calculation (it’s about 660 calories with 2 oz. dry pasta/person + the extra marinara).
Nutrition
Nutrition information is automatically calculated, so should only be used as an approximation.
© Salt & Lavender Inc. Content and photographs are copyrighted. Sharing this blog post is much appreciated, but copying and pasting full recipes without authorization to social media is strictly prohibited.


My family loves this!
Wonderful!! Thanks, Gina!!
easy to make. it’s a hit with my family. thank you
You are very welcome!!