This post may contain affiliate links. Please read our disclosure policy.
This Chicken Milanese recipe is an easy addition to your weekly chicken rotation! It has thin cutlets that are breaded and pan fried until golden, and they’re ready in about 30 minutes.
Head on over to my Parmesan Crusted Chicken or Easy Chicken Francese for more quick weeknight wonders.
Why you’ll love it
Chicken Milanese is another one of those classic recipes that has a fancy-sounding name but really couldn’t be simpler to make. It’s important to me to bring you meals that make day-to-day life easier, and this one definitely checks all the boxes. It tastes shockingly good for how few ingredients it has, and once you nail the technique, you’ll wonder why you hadn’t been making chicken this way all along.
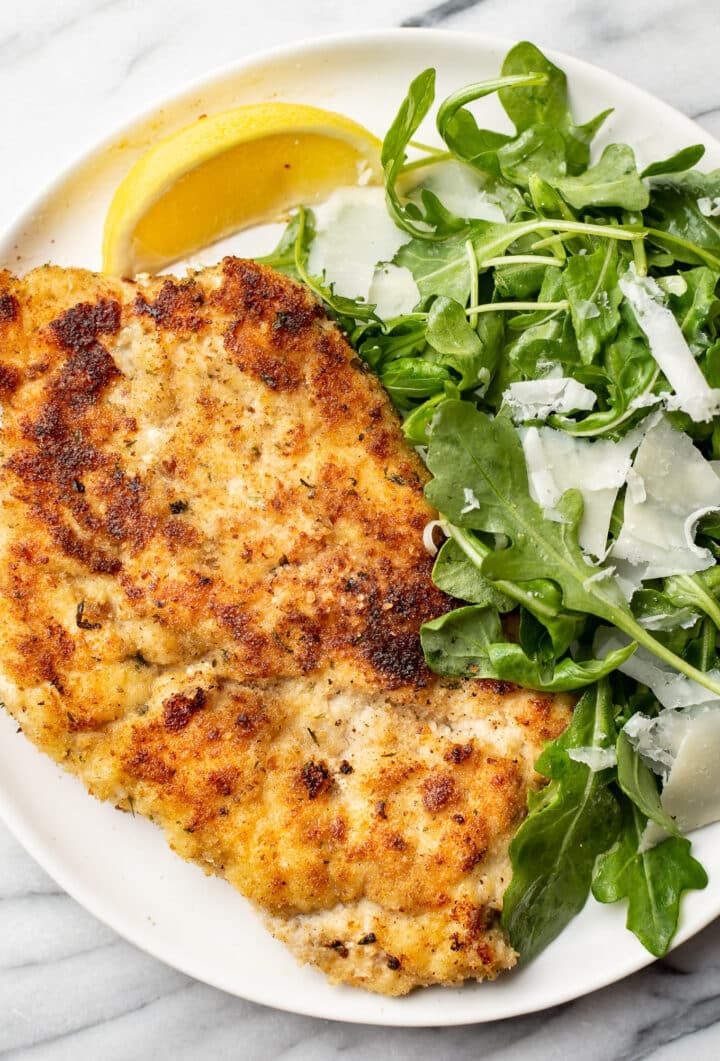
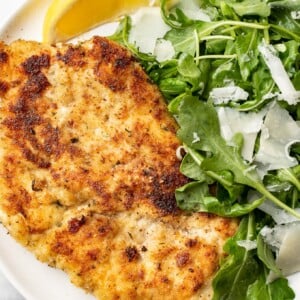
It’s often paired with an arugula salad like I did for the photos, but the beauty of homemade Chicken Milanese is that it goes with basically every side dish you can think of, and it’s inexpensive as well. You probably already have everything you need in your pantry to make this easy chicken recipe from scratch!
What does Chicken Milanese mean?
- “Milanese” is an adjective that means “in the Milanese cooking style” or “from Milan”, the city in Italy where this method originated. It can be veal or another meat, in this case chicken, that’s pounded, breaded, and pan fried.
What you’ll need
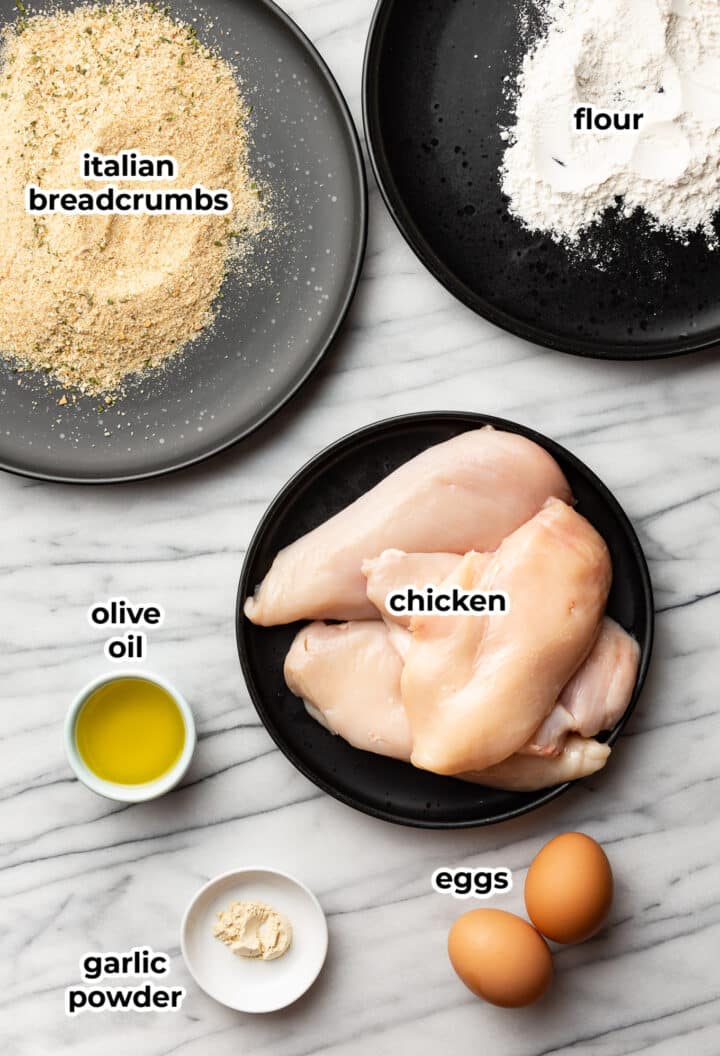
- Chicken breasts – we’re using two boneless, skinless ones cut into four thinner cutlets
- Garlic powder – along with salt & pepper, this infuses savory flavor right into the cutlets
- Flour – for dredging
- Eggs – to bind everything
- Italian breadcrumbs – these are breadcrumbs with dried Italian herbs added, giving them way more flavor than regular ones
- Olive oil – for sautéing
Helpful tips
- This recipe goes fairly quickly once everything is prepped, so ensure that your dredging assembly line is in order so that you’re completely comfortable and ready to go.
- Pat the chicken dry with paper towel before getting started so that the breading sticks better.
- Avoid moving the cutlets around the pan during cooking. Just flip them when they’re nicely golden.
- Don’t overcrowd the skillet, and make sure it’s good and hot and the oil is shimmering before getting started. Cooking in batches is best.
How to make Chicken Milanese
This is an overview with step-by-step photos. Full ingredients & instructions are in the recipe card below.
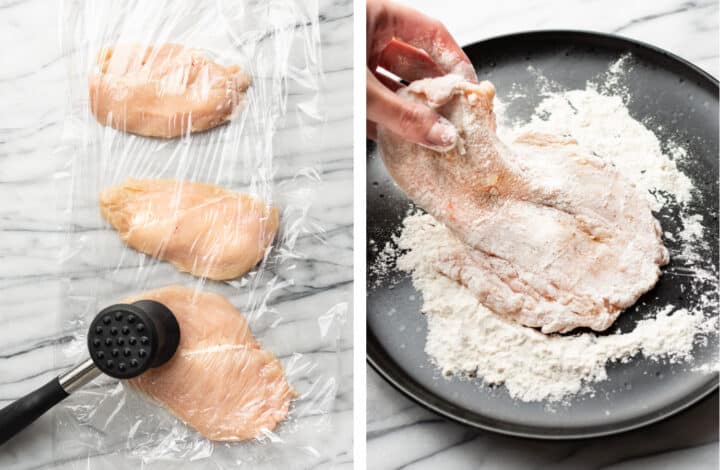
Cut the chicken in half lengthwise to make four thinner cutlets. Place them between two sheets of plastic wrap, and pound with a mallet. Season with the salt & pepper and garlic powder. Prep the dredging ingredients in separate bowls or plates. Meanwhile, add the olive oil to a skillet and heat it up.
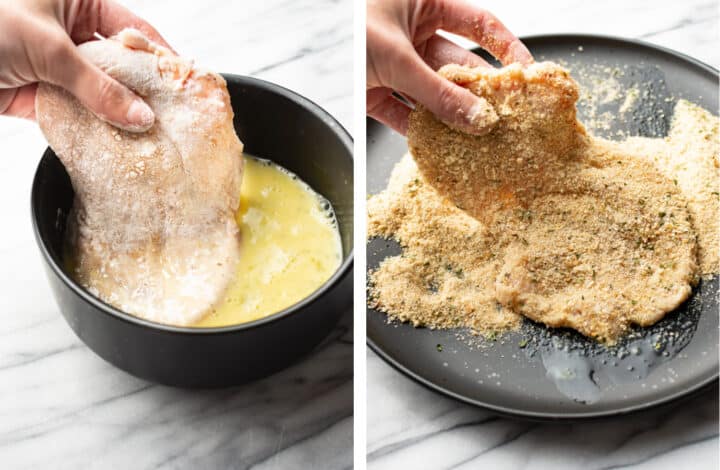
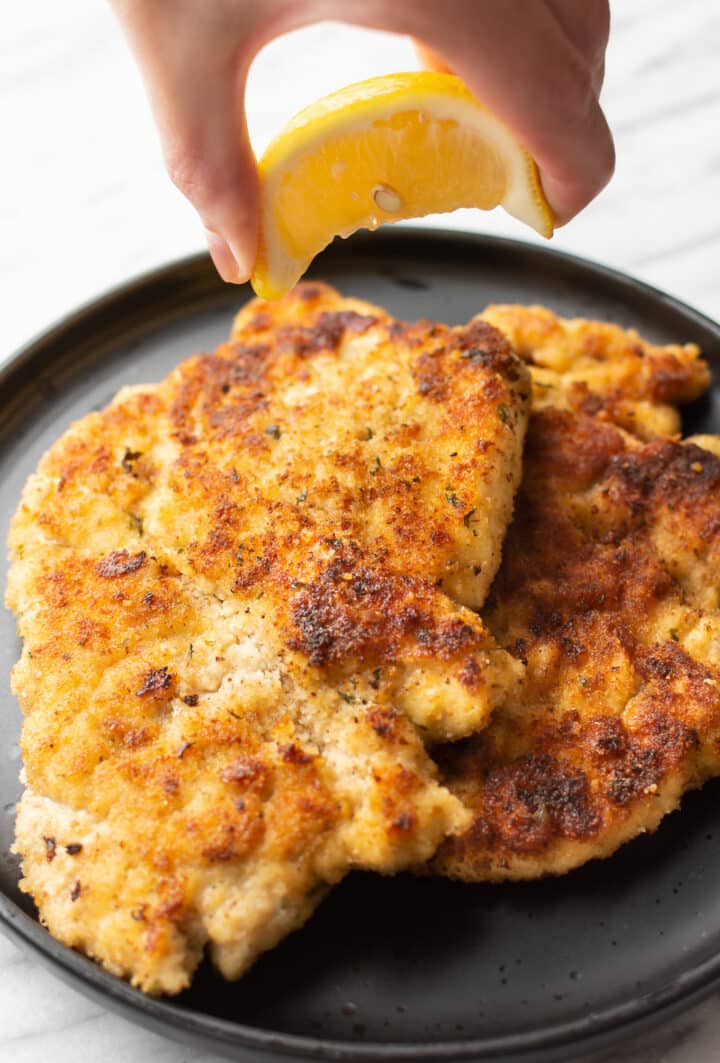
We’re frying two cutlets at a time. Dip each of them in the flour, then egg, and then breadcrumbs, letting the excess drip off after each stage. Cook for about 3 minutes per side until golden and the internal temperature reaches 165F. Remove the first two cutlets from the skillet, and repeat the steps with the second batch. Serve right away!
Tools for this recipe
Check out Natasha’s favorite kitchen essentials, gadgets, and cookware!
- Using a meat mallet is the best way to pound it, but in a pinch a rolling pin will work.
- This Staub skillet is one my of my favorites for skillet chicken recipes.
- Cooking tongs make it easy to flip the chicken.
- An instant read thermometer is an essential tool for any home chef. It’s inexpensive and takes the guesswork out of cooking meat.
Substitutions and variations
- I highly recommend using Italian style breadcrumbs, but if you only have plain, I would definitely jazz them up by adding some Italian seasoning and/or other herbs or spices you have on hand.
- Panko breadcrumbs will work for this recipe. They do have a different texture, though.
- You can easily make a larger quantity without worrying too much about exactly calculating everything. Have three chicken breasts? Just add another egg and a little more flour and breadcrumbs to your dredging bowls and plates.
What to serve with Chicken Milanese
- This recipe is fantastic with a squeeze of fresh lemon juice and my Super Simple Parmesan Arugula Salad or my Panzanella Salad Recipe.
- Craving something richer? Try it with pasta like my Easy Creamy Lemon Pasta or Creamy Pesto Gnocchi.
- I also enjoy a classic chicken, potatoes, and veggie combo. Pair it with my popular Garlic Mashed Potatoes and The Best Creamed Spinach for a cozy meal.
Leftovers and storage
- Leftover Chicken Milanese will keep in an airtight container in the fridge for 3-4 days, but the breading will soften up. It’s best served right away.
- I don’t recommend freezing it. The breading will almost certainly fall off.
- For best results, reheat in an air fryer at 350F for a couple of minutes to crisp up the breading again. You could also warm them in the oven at 400F using a wire rack on a baking sheet (for air circulation) to help restore the crispy breading.
More delicious chicken recipes
If you made this easy Chicken Milanese recipe or have any questions, talk to me in the comments below! You can also tag me #saltandlavender on Instagram if you made this or any of my recipes.
Chicken Milanese
Ingredients
- 2 large chicken breasts cut in half lengthwise
- Salt & pepper to taste
- 1/2 teaspoon garlic powder
- 1/4 cup flour
- 2 large eggs lightly beaten
- 1 cup Italian style breadcrumbs see note
- 2 tablespoons olive oil + more as needed
- Arugula salad for serving (optional)
- lemon wedges for serving (optional)
Instructions
- If making with my arugula salad, I suggest prepping the salad before getting started on the chicken and then adding the dressing and tossing the salad just prior to serving.
- Cut the chicken breasts in half lengthwise so you have four thinner pieces. Place them between 2 sheets of plastic wrap and then pound thin (to about 1/4") using the flat end of a meat mallet. Sprinkle both sides of the chicken with the salt & pepper and garlic powder.
- For the chicken dredge: Add the flour to a plate or bowl, the eggs to a bowl (and whisk them with a fork), and then the breadcrumbs to a third plate or bowl.
- Add the olive oil to a large skillet over medium-high heat (let the pan heat up for a few minutes). You will be frying two pieces of chicken at a time. One by one, coat the first two pieces of chicken with the flour, then the egg (let the excess drip off), then the breadcrumbs, and then add each piece to the skillet. Cook for about 3 minutes/side or until the crust is golden and the chicken is cooked through (165F). Take the chicken out of the pan and set it aside. Repeat for the second batch (add more oil if the pan is looking dry). The second batch tends to go faster, so keep an eye on it so it doesn't burn (you may need to turn the heat down a bit, especially if using cast iron).
- Serve immediately with lemon wedges and arugula salad if desired. See more serving options in the blog post.
Notes
- I highly recommend using Italian seasoned breadcrumbs as they’re more flavorful than plain. You can use regular breadcrumbs or panko. If using plain, add in 1/2 teaspoon or so if Italian seasoning.
- It’s a good practice to use an instant read meat thermometer to ensure chicken is cooked through (165F). Timing will vary depending on how thin the chicken has been pounded, how hot the pan is, etc.
- Nutrition info does NOT include the salad.
Nutrition
Nutrition information is automatically calculated, so should only be used as an approximation.
© Salt & Lavender Inc. Content and photographs are copyrighted. Sharing this blog post is much appreciated, but copying and pasting full recipes without authorization to social media is strictly prohibited.


We enjoyed this recipe. I forgot to dry the chicken, and our breading definitely didn’t stick as well because of it. But it was still good! I made a side of spaghetti with marinara sauce to go with it and it will stay in my meal rotation!
I’m so glad it worked out, Liz! Thanks for your 5-star review! 😀
Easy and delicious!
Thank you!!
Oh my goodness! I made this for dinner tonight and my husband keeps saying, “that was the best chicken I’ve ever had” and we eat alot of chicken! This created the most tender and flavorful chicken which was fabulous with the crispy, browned coating. I paired it with a caprese salad and a side of angel hair pasta with sauce, basil and parm. We are big fans of yours and this recipe is going on the top of our list as one of our all time favorites..Thank you!!
You’re very welcome, Deborah! 😀
Frequently requested by my husband who is kinda picky. Easy and delicious.
Love that!! Thank you!
So yummy and easy! The family loved it!!
Wonderful!! 😀 Thanks for your review!
Beautiful meal—so quick and easy for a busy mom and everyone loved it! I love her recipes!!!
Thank you so much, Elise!!
I’ve just started cooking, I’ll try these Milanese recipe, and the pasta. They seem very easy to do. Wish me luck.
Good luck!! 😀
This dish looks great and easy to make. I will definitely try it for my family, as we love chicken. Thank you for sharing the recipe ❤️
You’re welcome! Hope you love it, Simona! 🙂
Great and easy recipe, family loved!
I’m thrilled to hear that, Laura! Thanks for your 5-star review!
Such an amazing and delicious recipe! The chicken was tender and juicy, and the crust was crispy and filled with flavor! Can’t wait to make it again!!
I’m so happy you enjoyed it, Bethany!! 😀 I really appreciate your comment.