This post may contain affiliate links. Please read our disclosure policy.
This easy honey garlic chicken recipe has tender pan-fried chicken breasts with a sticky-sweet honey garlic glaze. It’s a family favorite that’s fast and simple to make!
You may also like my Honey Garlic Pork Tenderloin or Honey Glazed Salmon.
Why you’ll love it
The honey garlic sauce is syrupy and glorious in this easy chicken recipe! It’s made with only a handful of ingredients, so it’s one you can make any time. The sweet and savory flavors of soy sauce, garlic, and honey are concentrated into each tasty drop. It’s so good over rice.
This honey garlic chicken is a 30-minute meal that’s sure to hit the spot when those takeout cravings hit. It’s super straightforward to make and a quick chicken breast recipe that picky eaters love. I bet you have all the ingredients in your pantry and fridge ready to go!
What you’ll need
- Chicken – I use boneless skinless chicken breasts seasoned with salt & pepper
- Olive oil and butter – for sautéing
- Scallions – these mild green onions are optional but add a pop of contrast and freshness
- Soy sauce – use the low sodium variety
- Honey – it’s the sweet star of the glaze
- Chicken broth – for more savory depth of flavor
- Lemon juice – a touch of acidity balances out the sauce
- Garlic – we’re got plenty for that signature flavor
- Cornstarch – to thicken it up

Pro tip
Yes, this is a sweet sauce (I’m writing this because of past experiences with other honey-based sauces I’ve received comments on). Honey is very sweet. If you’re not someone who likes sweet sauces, then I’d skip this one. Or serve it with a bit of extra lemon juice squeezed over top!
Tools for this recipe
Check out Natasha’s favorite kitchen essentials, gadgets, and cookware!
- I use kitchen tongs to easily flip the chicken, and an instant read thermometer ensures the chicken is cooked perfectly.
- Any oven-safe skillet will work fine for this recipe. I use one of my trusty Le Creuset skillets for this particular one. I also love my Lodge cast iron (a more affordable option).
- You may also want a splatter guard and a garlic press!
How to make honey garlic chicken
This is an overview with step-by-step photos. Full ingredients & instructions are in the recipe card below.
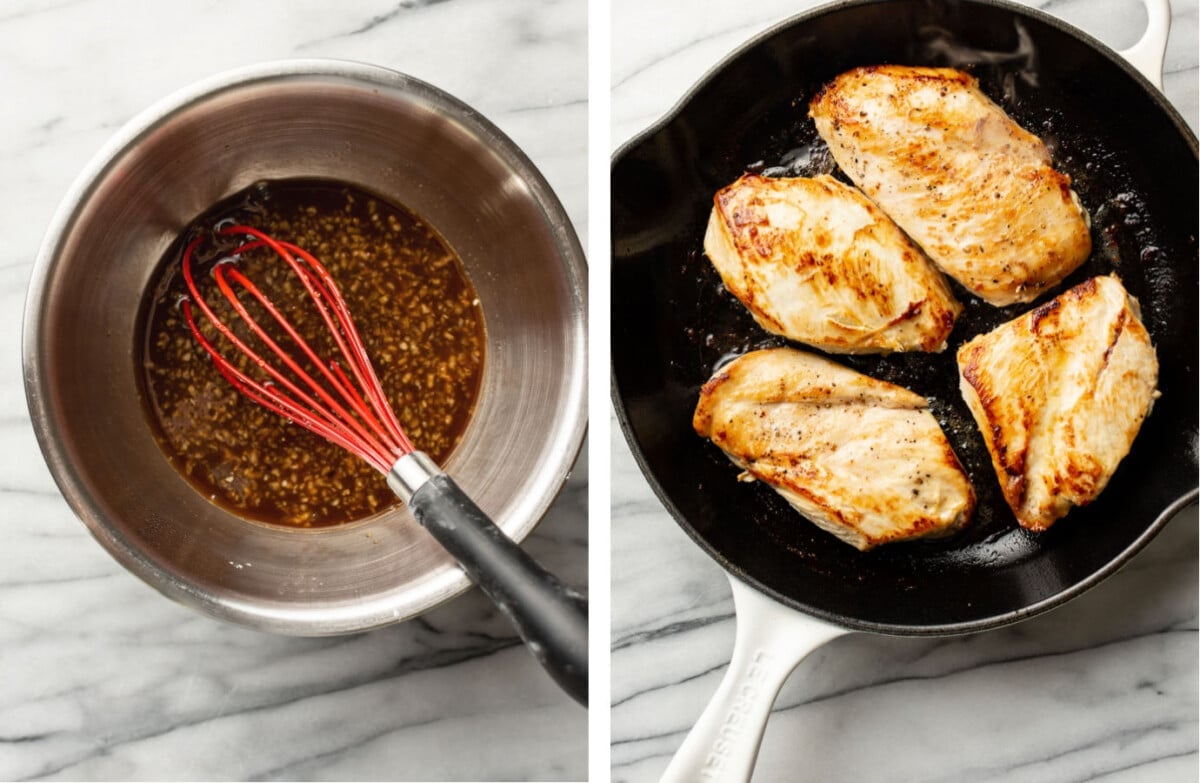
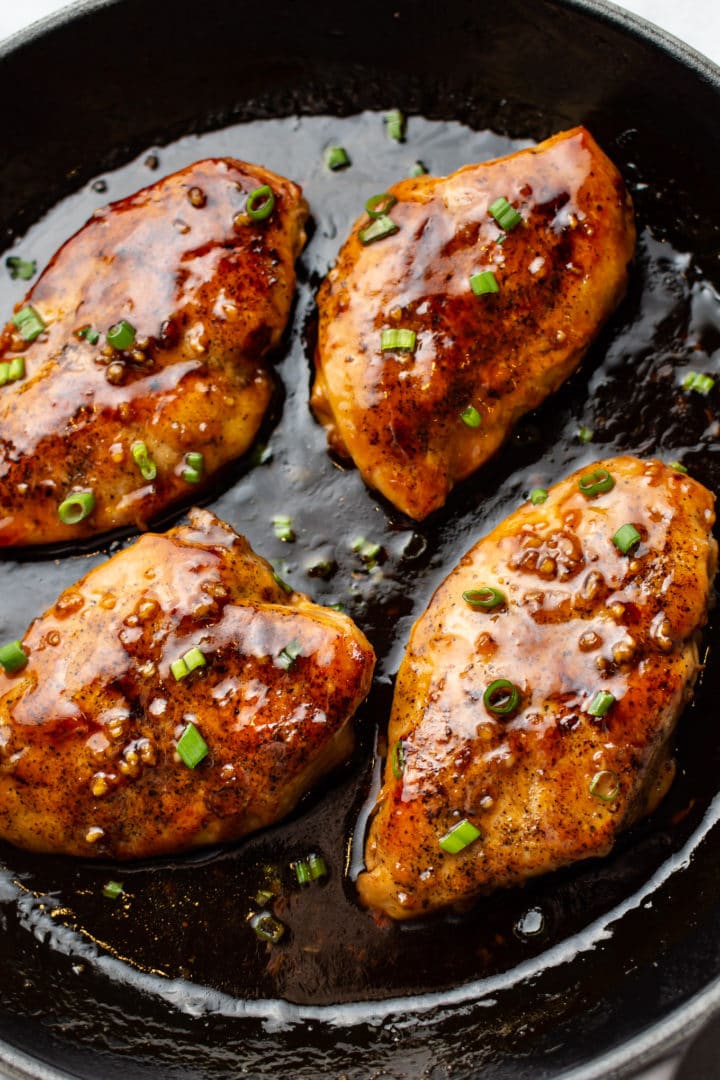
Preheat the oven. In a prep bowl, whisk together the sauce ingredients and set aside. Cut the chicken to make 4 thinner cutlets, and season with salt & pepper. Heat up the oil and butter in an oven-safe skillet. Cook the chicken until golden.
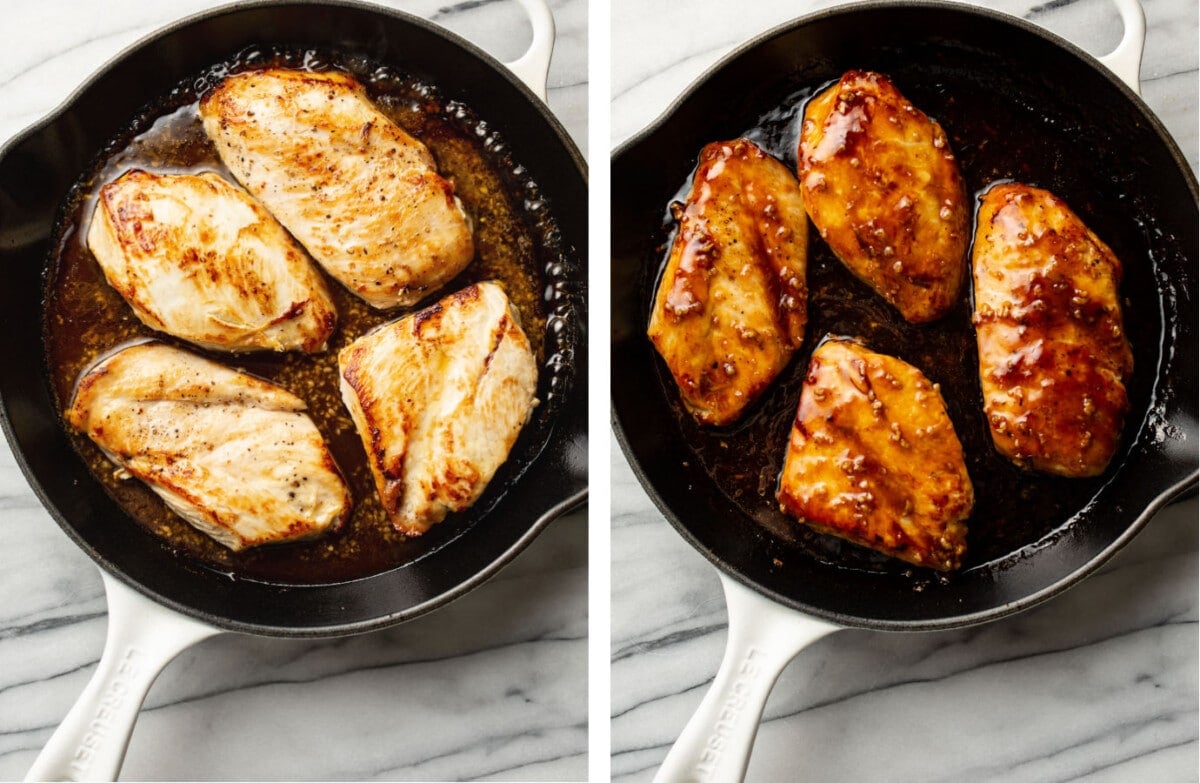
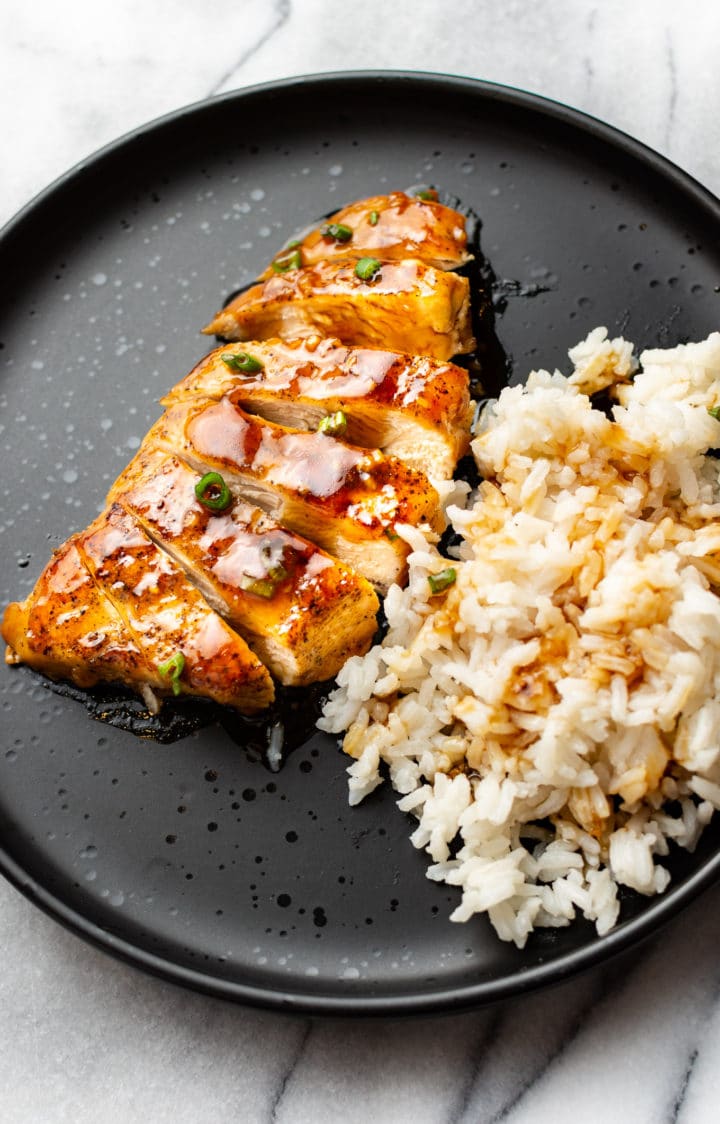
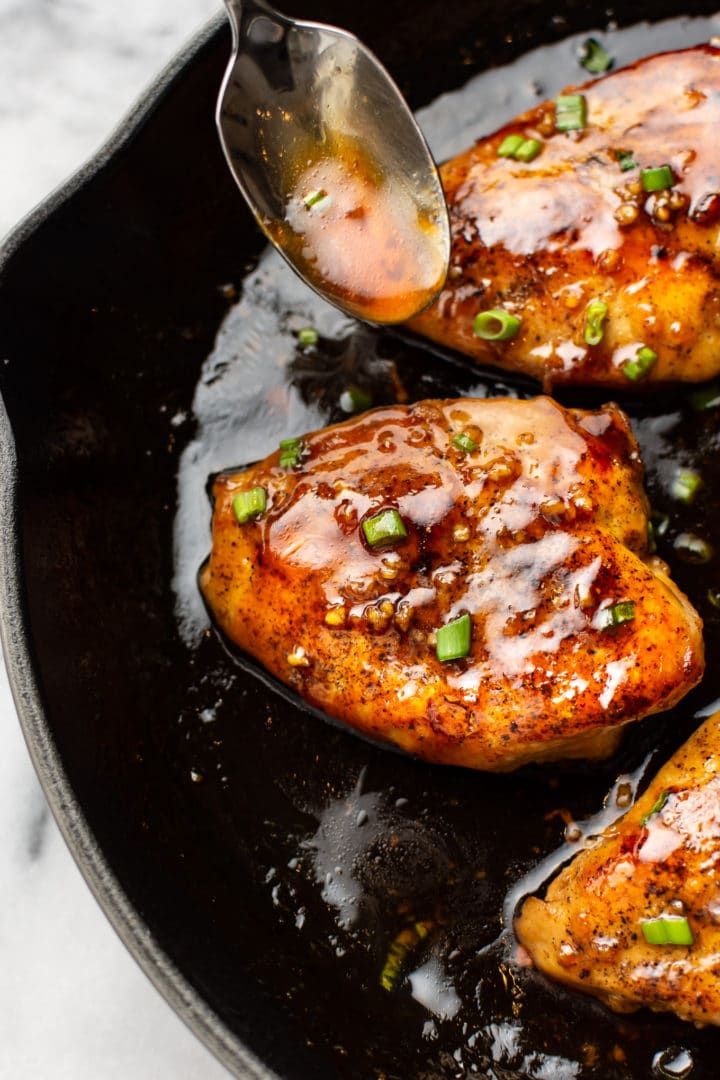
Give the sauce a quick stir, then pour into the pan between the cutlets. Let it bubble for half a minute, then remove from the heat (important so it doesn’t scorch/cement to the pan). Spoon some sauce over the chicken, then finish cooking in the oven until the chicken is cooked through and the sauce thickens. Top with scallions if using.
Substitutions and variations
- This recipe doesn’t make a ton of sauce, but the sauce is fairly rich and sweet, so a little does go a long way flavor-wise. If you do want a lot of sauce, I’d recommend doubling all the sauce ingredients.
- You could use chicken thighs, but they make take a little longer, especially if you use bone-in skin-on ones. I’d do the initial searing step for a bit longer. Or try my Honey Garlic Slow Cooker Chicken Thighs instead.
What to serve with honey garlic chicken
- I like using a long grain white rice like jasmine.
- My Garlic Mashed Potatoes, a Baked Potato, or even pasta/noodles would also work depending on what you’re in the mood for.
- Steamed veggies are another option. Try broccoli/broccolini or green beans on the side. A nice salad pairing would be this Broccoli Ramen Salad.
Storage and leftovers
- Store for 3-4 days in the fridge in a covered container.
- Reheat slowly over a low heat on the stove in a covered saucepan, or microwave it. Be careful because the sauce will continue to thicken, and reheating it too hot will just lead to a stuck-on mess.
- If you have to freeze leftovers, keep in mind that there’s a good chance the texture of the sauce will change.
If you made this honey garlic chicken breast recipe, leave me a star rating and comment below! Tag me #saltandlavender on Instagram so I can see your S&L creations.

Honey Garlic Chicken
Ingredients
- 2 large chicken breasts
- Salt & pepper to taste
- 1 tablespoon olive oil
- 1 tablespoon butter
- Chopped scallions to taste (optional but recommended)
Sauce:
- 3 tablespoons low sodium soy sauce
- 1/4 cup honey
- 1/4 cup chicken broth
- 1/2 tablespoon lemon juice or apple cider vinegar
- 4 cloves garlic minced
- 1 tablespoon cornstarch
Instructions
- Preheat your oven to 400F and move the rack to the top third of the oven.
- Add the sauce ingredients to a small bowl and whisk them together. Set aside.
- Cut the chicken breasts in half lengthwise so you have 4 thinner pieces. Season them with salt & pepper.
- Add the oil and butter to an oven-safe skillet over medium-high heat. Let the skillet heat up for a few minutes.
- Cook the chicken for 4-5 minutes/side until golden.
- Give the sauce another quick whisk and then pour it into the skillet in between the chicken pieces. Let it bubble for 30 seconds, then take the pan off the heat. Quickly spoon some sauce over the chicken and then place the skillet in the oven for 4-5 minutes or until the chicken is cooked through (165F) and the sauce thickens up a little more. Do not cook much longer or the sauce will burn.
- Serve immediately (I spoon more sauce over top and add the chopped scallions).
Notes
- Use an instant read thermometer to ensure chicken is never undercooked or overcooked and dry.
- I recommend an oven-proof skillet for this recipe. You can transfer the chicken to a baking dish for the oven portion of the recipe if you are in a pinch, though.
Nutrition
Nutrition information is automatically calculated, so should only be used as an approximation.
© Salt & Lavender Inc. Content and photographs are copyrighted. Sharing this blog post is much appreciated, but copying and pasting full recipes without authorization to social media is strictly prohibited.


I recommend you move your sentence “I recommend an oven-proof skillet for this recipe. You can transfer the chicken to a baking dish for the oven portion of the recipe if you are in a pinch, though” Higher up into the instructions, because as it reads now, people are being asked to heat the oven to 400F just so they can cook the chick on the stove top. Then you don’t tell them it’s an option or how long to bake the chicken at.
I prepped it in the pan and then transferred to the oven, but the less cooking savvy people might become confused.
The sauce was very good. I chose to use the apple cider vinegar as it leaves a tang. It’s a reliable result when using the vinegar. I increased the sauce portions so I could drizzle the extra amount over top the chicken 1/2 to 3/4 the way through baking.
Cheers
I couldn’t edit my comment, so to clarify you should have included that sentence so junior cooks get the full picture about what dishes they can use. Not everyone has an oven proof skillet and can get confused. My comments come from my experience teaching the adolescents in the family to cook bigger meals and when starting out, they really appreciate the clarity.
Cheers
Hi Hilary! I’m glad you liked it. I’m not quite sure I understand your comment. In step 6 I say exactly how long to bake the chicken for: “Quickly spoon some sauce over the chicken and then place the skillet in the oven for 4-5 minutes or until the chicken is cooked through (165F) and the sauce thickens up a little more.” My note that you recommend putting higher in the instructions is simply another option I am offering to anyone who doesn’t have an oven-proof skillet and still wants to make the recipe.
Easy to prepare and lot of great flavor … will definitely make this easy dish again.
Wonderful! Thanks for your review, Jen!!
Very nice! Easy to prepare! Great flavour but I added a bit more stuff! I followed sauce recipe to the letter but I felt it was a bit more sweet than I like! But I did add orange juice to the liquid part! So that would of heightened the sweetness level! I sliced my potato’s fairly thin like. I added mushrooms n matchstick carrots as well.
Overall I was very pleased how everything cooked at same time. I seared my chicken first, but I’ll make sure I don’t cook it too long! Thank you Natasha! This will be great for a dinner party! 🙌
I’m so glad you were able to tweak it! Sounds delicious. 🙂
I added some red pepper flakes to tone down the sweetness and give a little kick, it was amazing!
Oh my gosh. Found on Pinterest. My husband and I loved this recipe. I made jasmine rice and green beans. Delicious!
(I used refrigerated lemon juice. It was fine.)
Yay!! I’m so happy it was a hit, Mary! 🙂 Thanks for your review!
Would love to try this ..
Can I use refrigerated bottle lemon juice ?
I never use it, but I think it should be ok. Let me know!
This meal is delicious. Made it tonight for the family and it was well received. Pretty easy to make and very tasty. Will definitely make this again. Next time I will make more sauce as I added additional chicken and did not make enough extra sauce. Thanks for sharing all these awesome dishes!!!
You’re welcome, Bruce!!! I appreciate your review! 🙂 So glad everyone liked it.
My girlfriend and I made this for dinner tonight and it is amazing. Tangy but not too sweet, paired with a coconut Jasmine rice and cracked black pepper Brussels sprouts on the side. DEEE-LICIOUS!
I’m so happy you guys liked it!! The sides sound delicious. 🙂
I cannot believe this recipe has one review/vote! As blogger specified, this recipe is SWEET and I did double my sauce (for my fam it was too much, but that was okay). This recipe was so tasty, the teen said they liked it too! Prep & cook time was pretty accurate, lol, and I think I was close to those times, so quick tasty recipe, I recommend.
I’m so happy that you enjoyed it, Kelly!! Appreciate you taking the time to write me a review. 🙂
Only discovered this recipe about a week ago and we’ve already made it twice! Tripled the recipe this last time for extra leftovers!! So delicious and sweet. Added cashews to pan after the sauce thickened for some crunch. The green onions are an absolute must. Served over rice with broccoli and topped with sesame seeds. This is definitely going to be a new staple recipe in this house!
That’s awesome!! I’m so glad you like it so much! I love the cashews idea. Thanks for taking the time to write me a review!
Can this be done in the crockpot? If yes how long?
Hi! Unfortunately, this isn’t a recipe like a soup where it can just be straight adapted by me guessing. I would need to test it out to have any confidence that it would actually work. I mean, you could give it a try if you’re in an experimenting mood, but I am not sure that it’ll work with the ingredient quantities listed. I would add the cornstarch in at the very end if you do want to attempt it, but it may be best to Google a Crockpot version (and I am adding one to my list to make eventually). Sorry!